The audition process will consist of both a pre-recorded audition to be submitted prior to your scheduled day and a "live" component over Zoom on your scheduled day. Only scales, sight-reading, and the theory exam will take place on Zoom on the day of your audition. All other required materials should be submitted in a video recording.
In order to best assess your audition, we ask that you submit a video of you performing your materials (rather than simply an audio recording). While the full video does not need to be completed in one take, each selection must be done in one take (not multiple takes edited together). Below are some guidelines for best results.
YOU WILL SUBMIT VIDEOS AFTER REGISTERING FOR YOUR AUDITION DATE.
Format
- If possible, please upload your video as an .mp4 file. Other acceptable file types are .mpeg4, .mov, .avi, or .wmv, but please test your video before submitting.
- If you are unable to upload your file for some reason, you can submit a link to a video hosted elsewhere (YouTube, Vimeo, Google Drive, etc.). Please ensure your sharing settings are correct (e.g. unlisted on YouTube, accessible to anyone with the link on a cloud storage service) before submitting your form.
Audio
- If you have access to an external microphone, this will likely improve your sound quality.
- Do some test recordings beforehand to find just the right microphone placement and audio settings.
- Distortion may be easily fixed by "aiming" away from the microphone and/or moving it farther away.
- If you are recording on a phone and using a bluetooth microphone, you may have an issue with audio/video sync being off. Use a wired microphone to avoid this.
- Record in a space with minimal noise bleed from surrounding spaces. Be aware of ambient noise such as lawnmowers or traffic and try to minimize it.
- No need to get studio-quality recording. We know people are doing this in their homes with the equipment they have. Do your best and use some trial and error to find the right setup so you sound your best.
- If you have to choose between better audio or video quality, go with better audio quality.
Lighting
- Use a well-lit space.
- Daylight in a room with several windows is often very good.
- For best results, put the camera between the primary light source (lamps, window, etc.) and the performer.
- Bright lighting behind the performer will result in the video being too dark for us to see details and must be avoided.
Camera height
- Place the camera at chest or face height of the performer.
- The video should be shot straight on.
- Do not position the camera so that it is directed up toward the performer.
Framing
- For instrumentalists, generally frame the video so that your hands and face are visible at all times.
- Position music stand (if used) so it does not block the shot.
- More specific instructions can be found below.
- MASKS ARE WORN IN MOST PHOTOS BECAUSE OUR STUDENTS MUST WEAR THEM. PLEASE DO NOT WEAR A MASK IN YOUR VIDEO UNLESS YOU ABSOLUTELY MUST RECORD SOMEWHERE THEY ARE REQUIRED.
Violin and Viola

- Distance: Capture an image of the full instrument, from tip of scroll to the bow hand when playing at the tip.
- Angle: Point the scroll to the side so that the faceplate is toward the camera. Do not point the scroll toward the camera.
'Cello and Bass
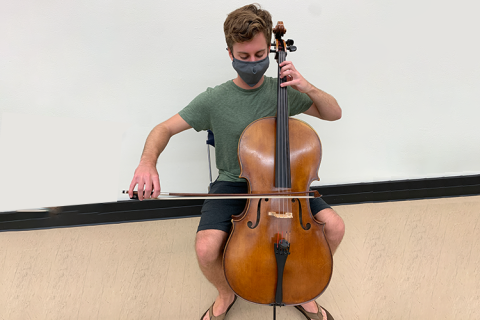
- Distance: Capture an image of the full instrument, from lower bout to scroll, including the bow hand when playing at the tip.
- Angle: Direct the faceplate toward the camera, with the music stand to the side and not blocking the image.
Voice

- Distance: Capture the full perfomer from the knees up.
- Angle: Face straight forward at the camera.
- Accompaniment: Accompaniment must be used as appropriate. Both live and pre-recorded accompaniments are permitted.
Woodwinds
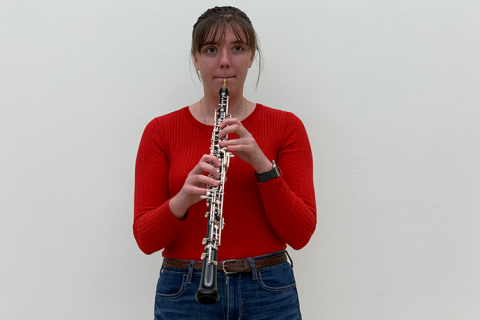
- Distance: Include the entire instrument, hands, and head in frame.
- Angle: Face camera straight on so embouchure, fingers, and keys are visible.
Brass
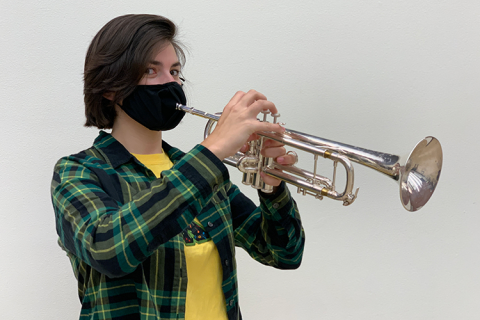
- Distance: Include the whole instrument, hands, arms, and head are visible in frame. Trombonists make sure your slide hand stays in frame down to 7th position.
- Angle: Aim bell away from camera and ensure valves/slide hand are visible.
Percussion
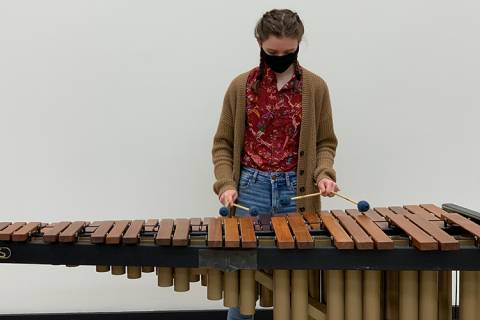
- Distance: Include entire instrument width and height from playing surface through top of head.
- Angle: Face camera straight on. Make sure music stand does not block performer's hands from view.
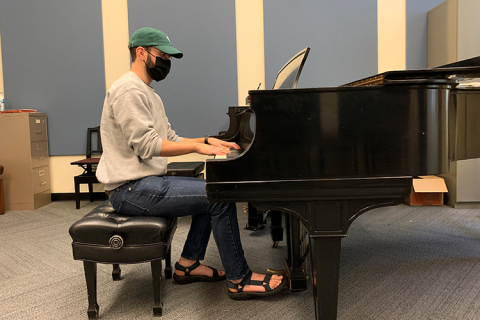
Piano
Guitar
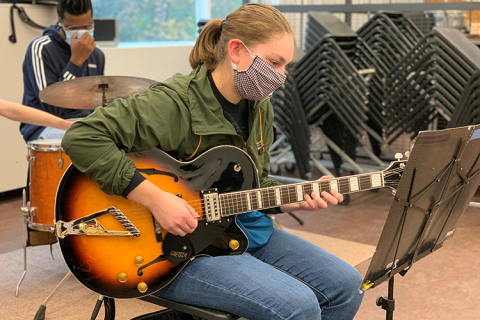
- Distance: Include the full guitar, arms, and head in the frame.
- Angle: Be as flat on as you can while keeping music stand out of the way.
- Notes: This shot is not ideal because it is not in front of a neutral background, but it is well-lit and framed well.
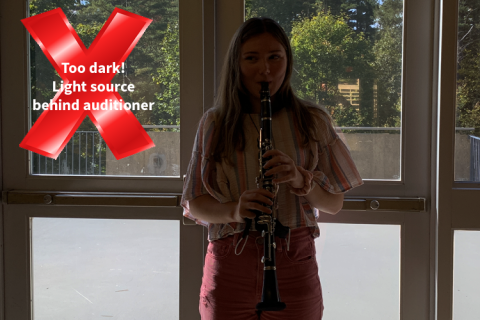
- Primary light source is behind the performer so their face, hands, and instrument are not clearly visible.
- Either reorient so that the light is behind the camera (performer and camera switch places) or add supplemental lighting facing the performer to balance it out.
- In this case, the shot is also a bit too wide. Zoom in more so just the top of the head to the bottom of the bell are visible, allowing for more detail to be seen.

- Video is framed too close so the performer's hands and the instrument are not visible.
- Zoom out and/or move camera farther away.